How To Install An Aluminum Fence
A comprehensive do-it-yourself (DIY) guide to installing aluminum fencing.
We are incredibly proud to provide only the highest quality aluminum fencing. This guide is meant to help guide you through the installation process. If you have any questions, don't hesitate to contact our team at (888) 378-1096, and we would be happy to help!
Before Getting Started
- Be sure to check your local zoning laws. Local zoning and Home Owner’s Associations (HOAs) may have regulations regarding the style and height of your fence. Check to make sure you have the proper permit sign-off beforehand.
- Contact your local utility companies. You need to let the utility company mark your property to ensure you do not puncture any electrical, gas, or water lines.
- Pay to mark your property line. Being proactive will save you time and money while helping to avoid disputes from neighboring properties.
Sketch a Plan and Confirm the Materials Required
Step 1: First, draw out your fence plan on paper. Use this drawing to help estimate the materials needed and help plan the corners and gates' locations. Show the house, driveway, deck, and property line.
Step 2: Measure as accurately as possible with a tape measure and mark them on your drawing. (The layout should show fence lines and gate locations.)
Step 3: Determine the number of sections and posts required for the project. The opening you leave for the gate should be the same width as the gate. A 48-inch walk gate’s opening should be left for a 48-inch gate (the actual width of the gate I 46.6 inches but fits in a 48-inch opening)
Material Checklist
- String
- Stakes
- Tape Measure
- Rubber Mallet
- Concrete Mix
- Post Hole Digger
- Pea Stone
- Level
- Hacksaw
- Shovel
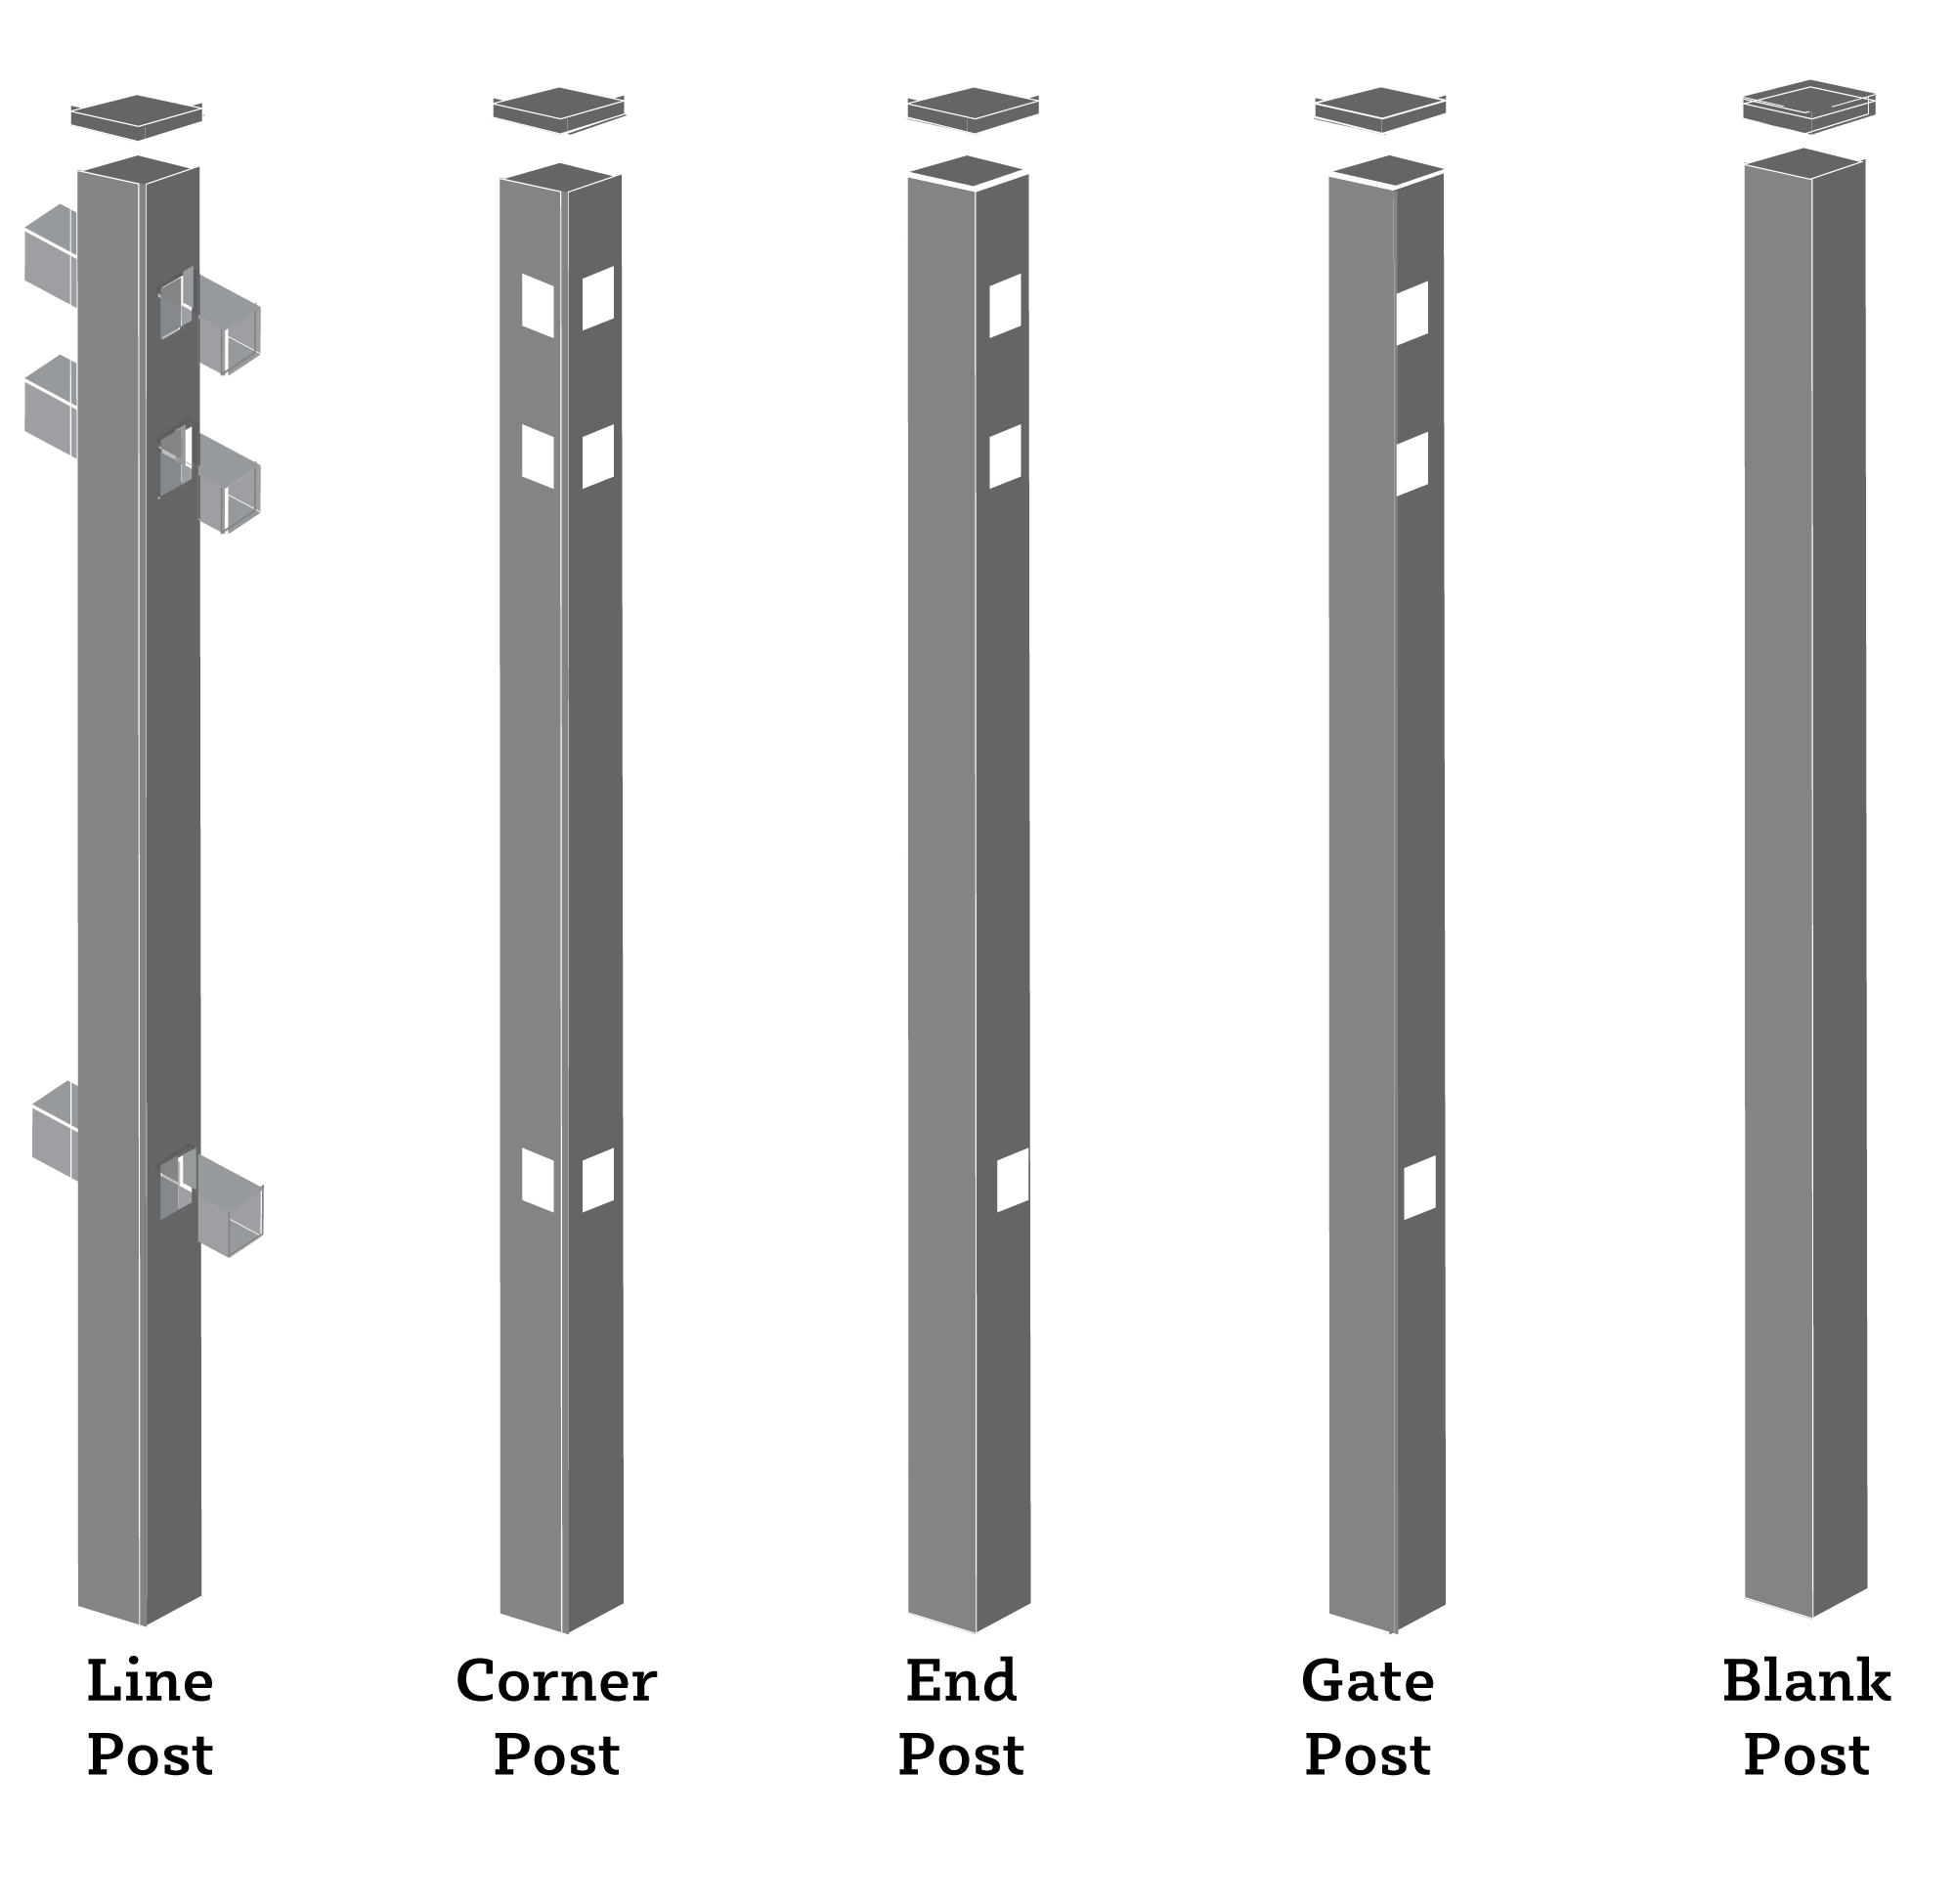
Types Of Posts
Line Posts: Posts that have holes on the opposite sides to connect fencing sections
Corner Posts: Used to connect two sections of a fence together to 90 degrees
End Post: Used to end a row of the fence. Only one section of the fence will connect to the end post
Blank Post: Does not have holes and is used with a gate latch or hinge
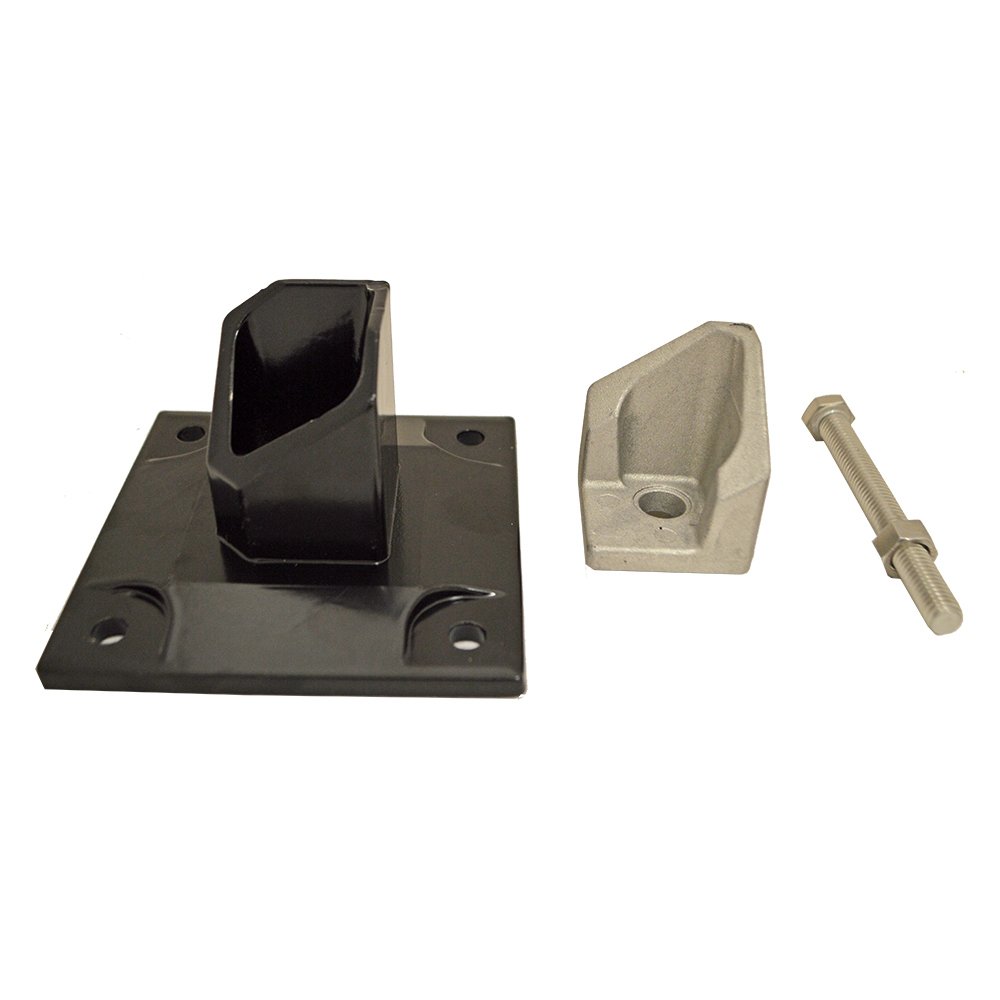
Heavy-Duty Gate Post: Has a wall heavier than other posts to support the weight of a gate that is attached to hinges. Like an end post, heavy-duty gate posts only have holes on one side
Installation Tips
- Gates need to be installed on level ground
- Gates and fence panels should be installed 2 inches off of the ground to allow for lawn maintenance or trimming
- Once it is installed, the top of the post will be at the same height as the top of the tallest part of the fence panel
- Separate and identify your posts. The rails from the fence panels will be inserted into the pre-cut-out holes on the posts
Product Overview
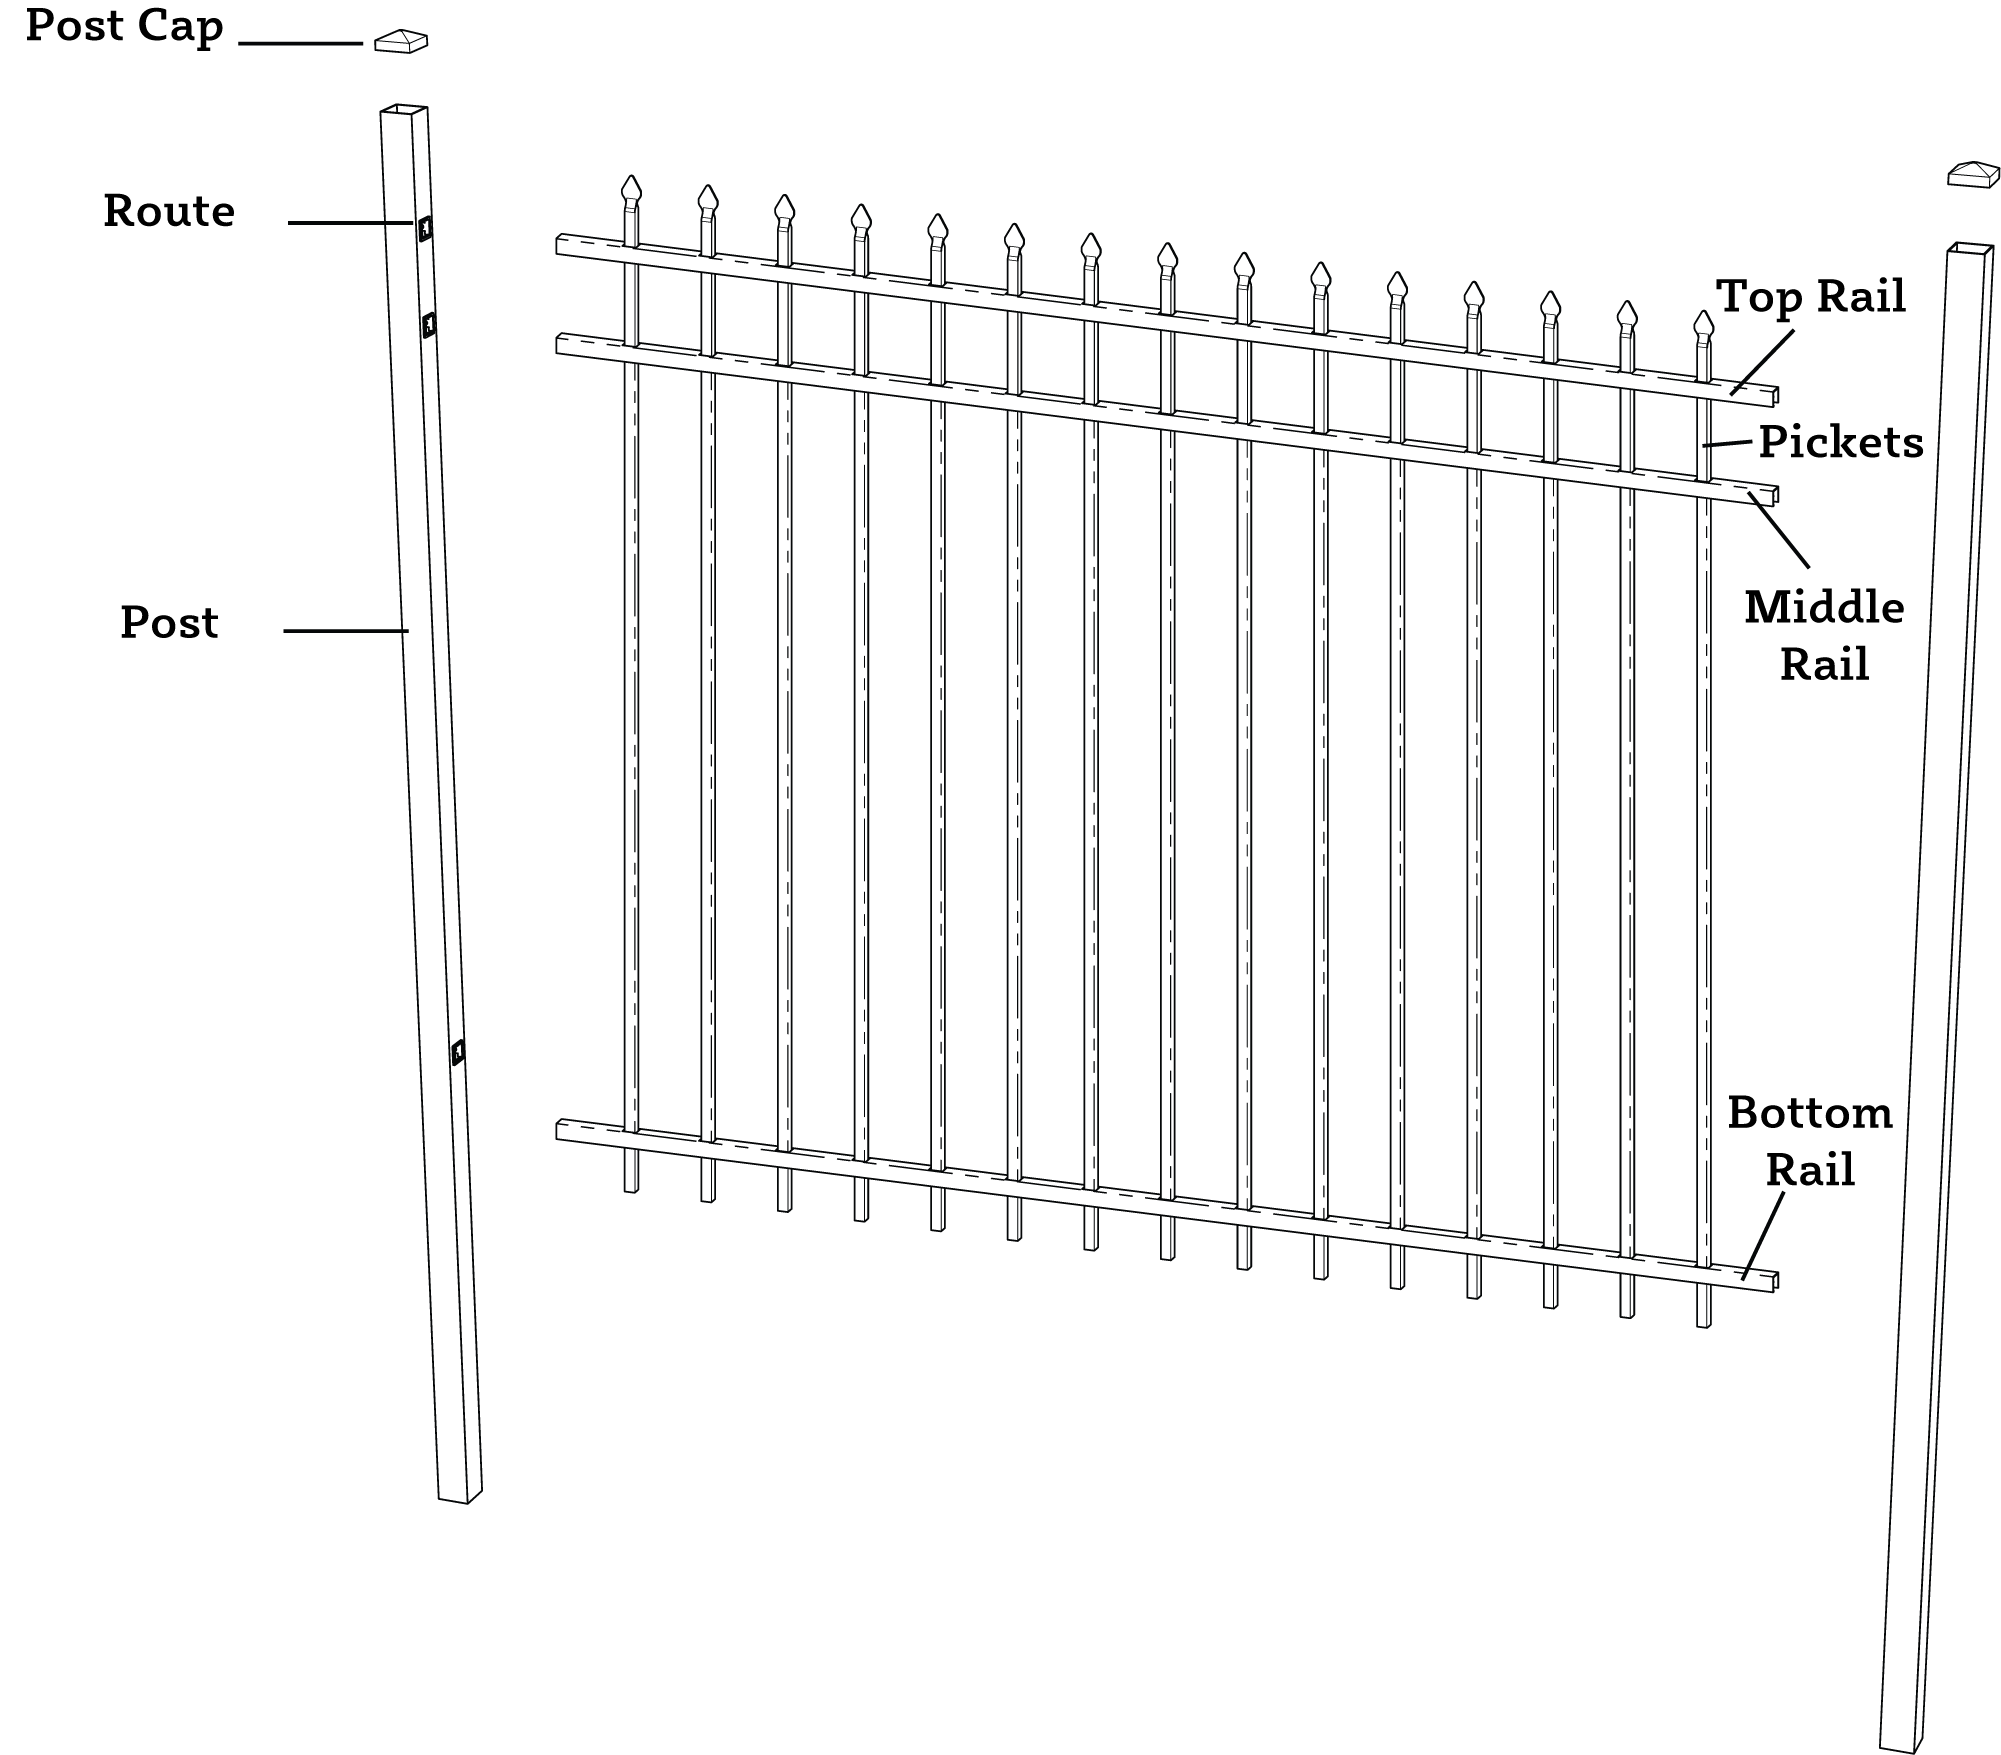
Layout Installation
Step 1: The layout of the gate will determine the layout of the posts for your fence line. To make sure that your fence run is straight, install line stakes and run a string line. The string line should be very tight on one side of the posts.
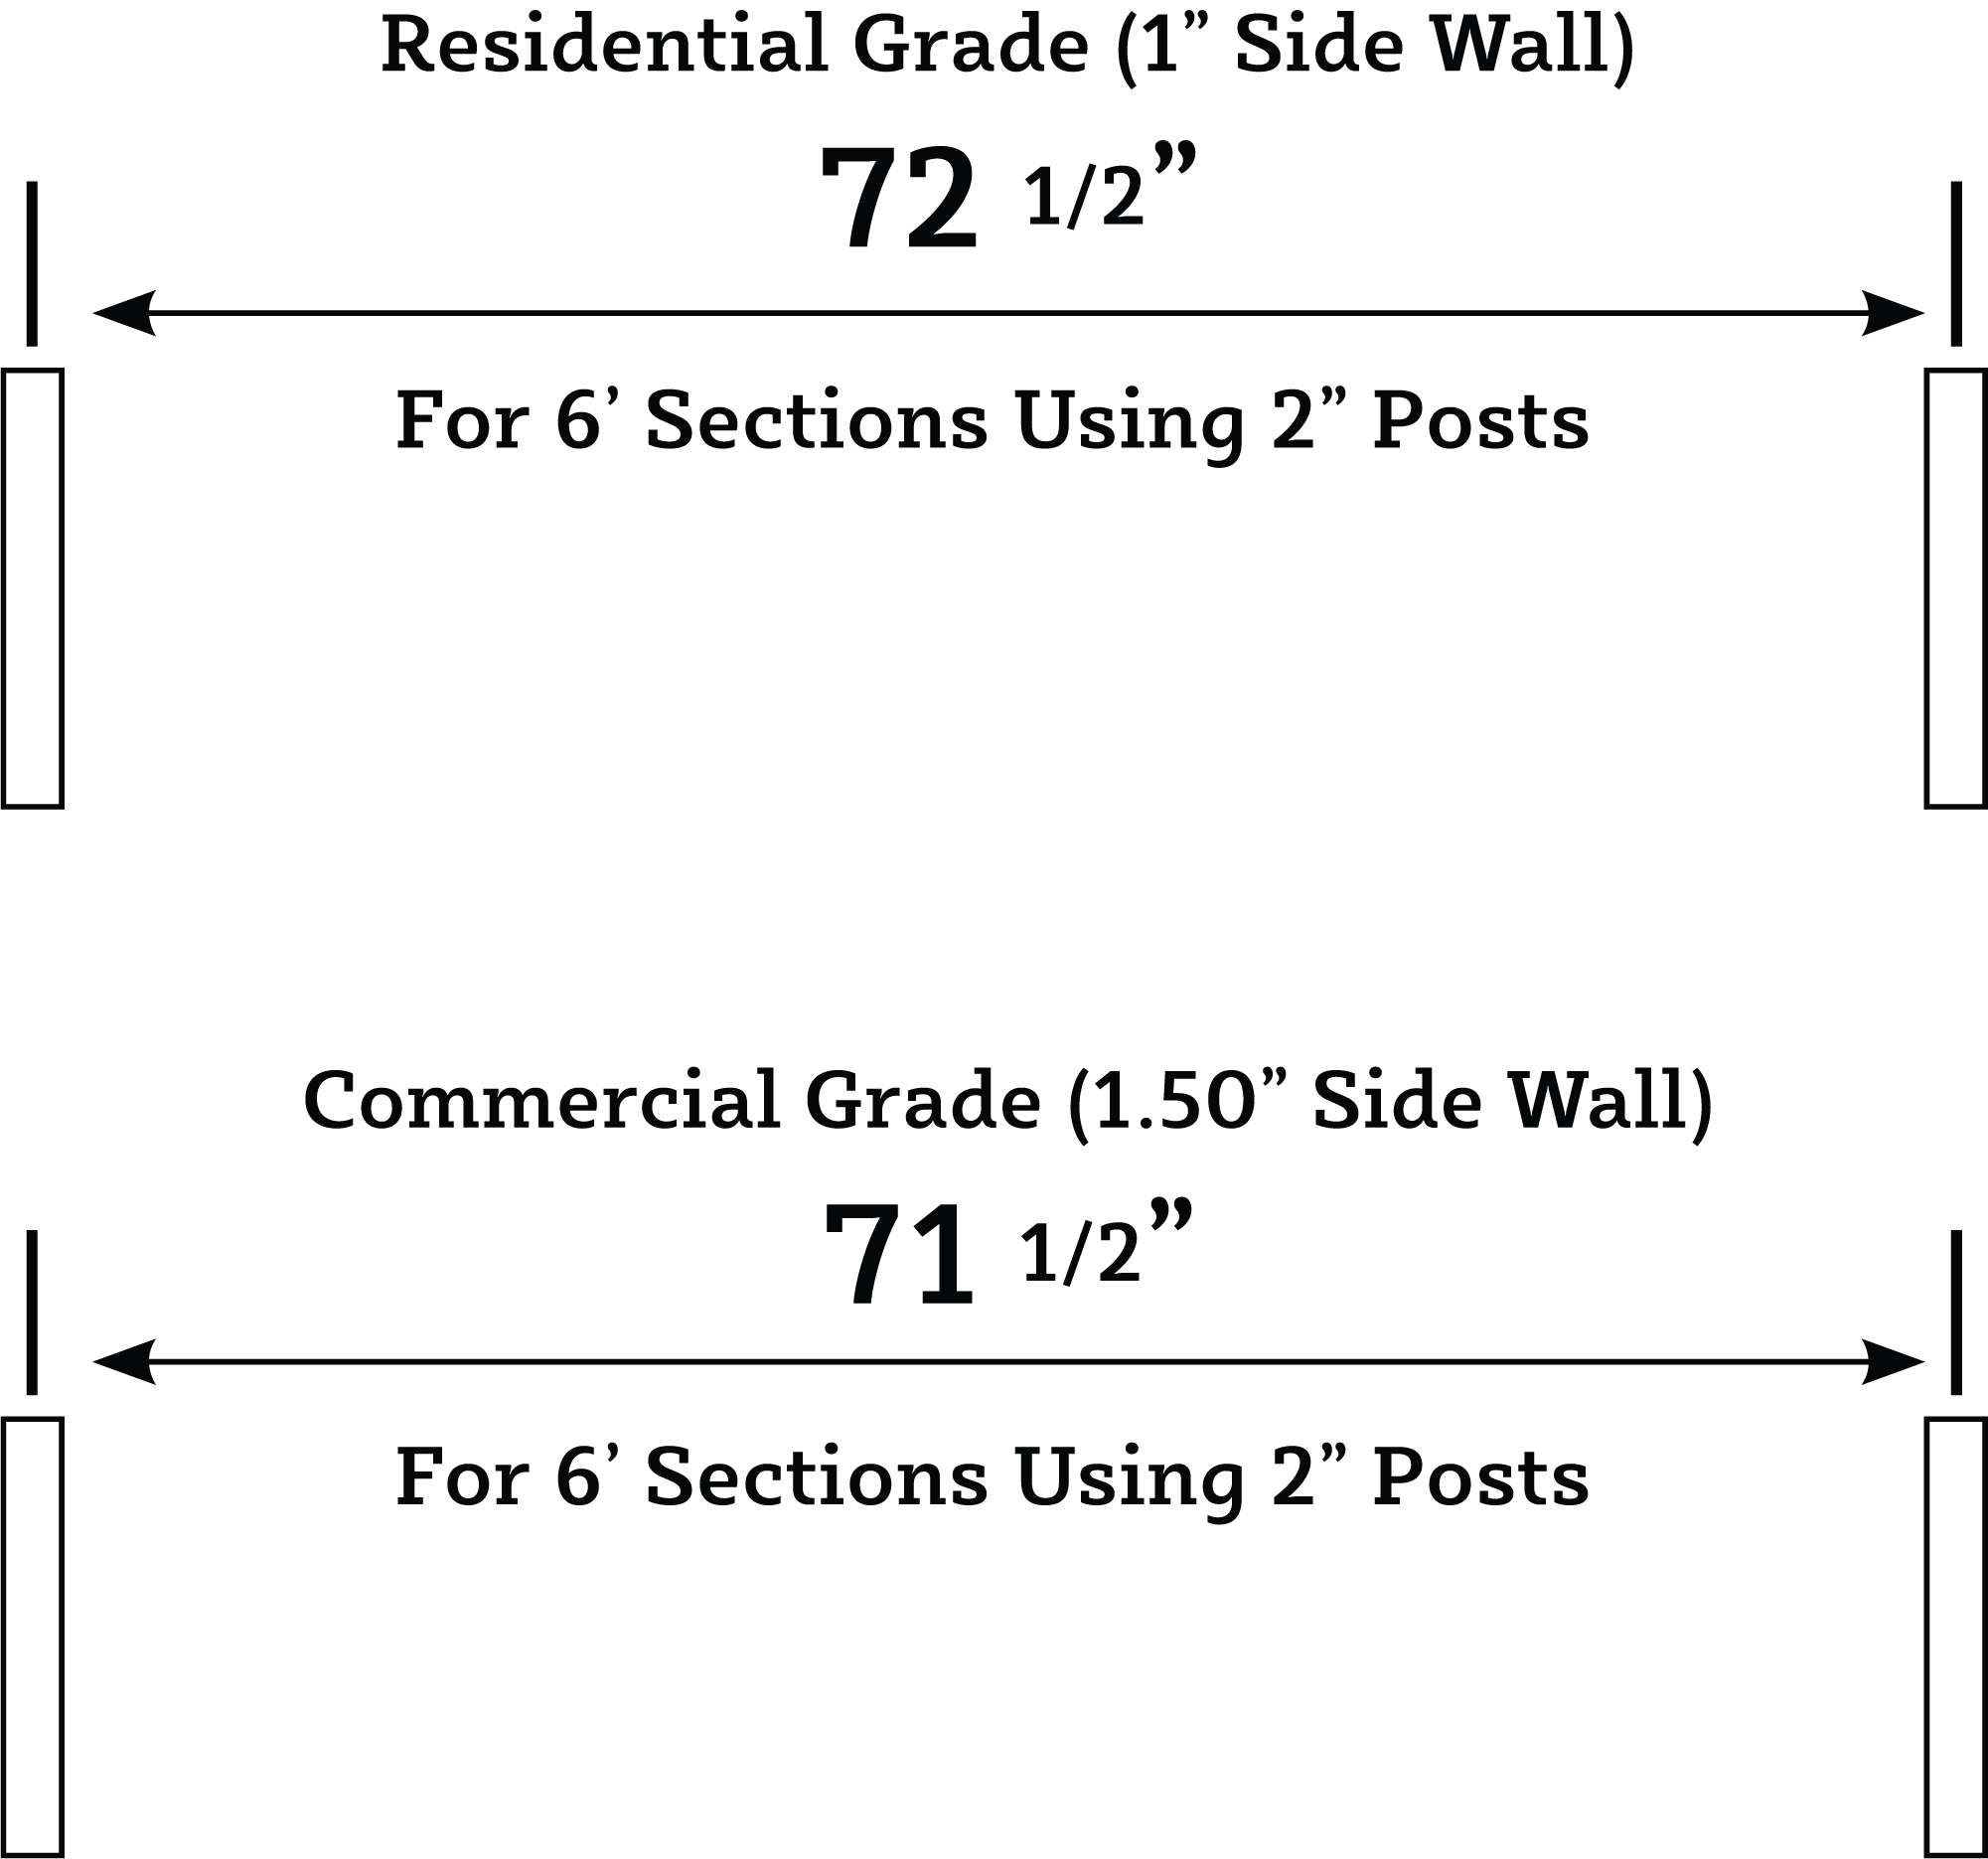
Step 2: Mark the location for each post with a stake. For residential fencing (1-inch side wall), leave 72 ½ inches in the center between each post. For commercial fencing (1.5-inch side wall), leave 71 ½ inches on the center between each post. Note: if the space you left is less than a full panel, you can cut the panel to fit the space using a hacksaw.
Step 3: Tie the string to each stake. Note: The fence will likely need to be set up from the property lines required by your local building codes (usually 2-4 inches).
Post Installation
Step 1: Use a rubber mallet to drive the post caps onto the posts gently. Be careful not to damage the top of the post

Step 2: Mix the concrete on the dry side to hold the posts in place faster. See the chart below to help determine the minimum depth for your fence. Note: In areas where frost occurs on the ground, the concrete foundations should be extended below the frost line (usually below 12 inches). This will account for frost “heave,” where the groundwater freezes and expands upwards. By providing this 12-inch drainage system, you can keep the frost heave from affecting the posts. Verify that depths meet all local building codes.
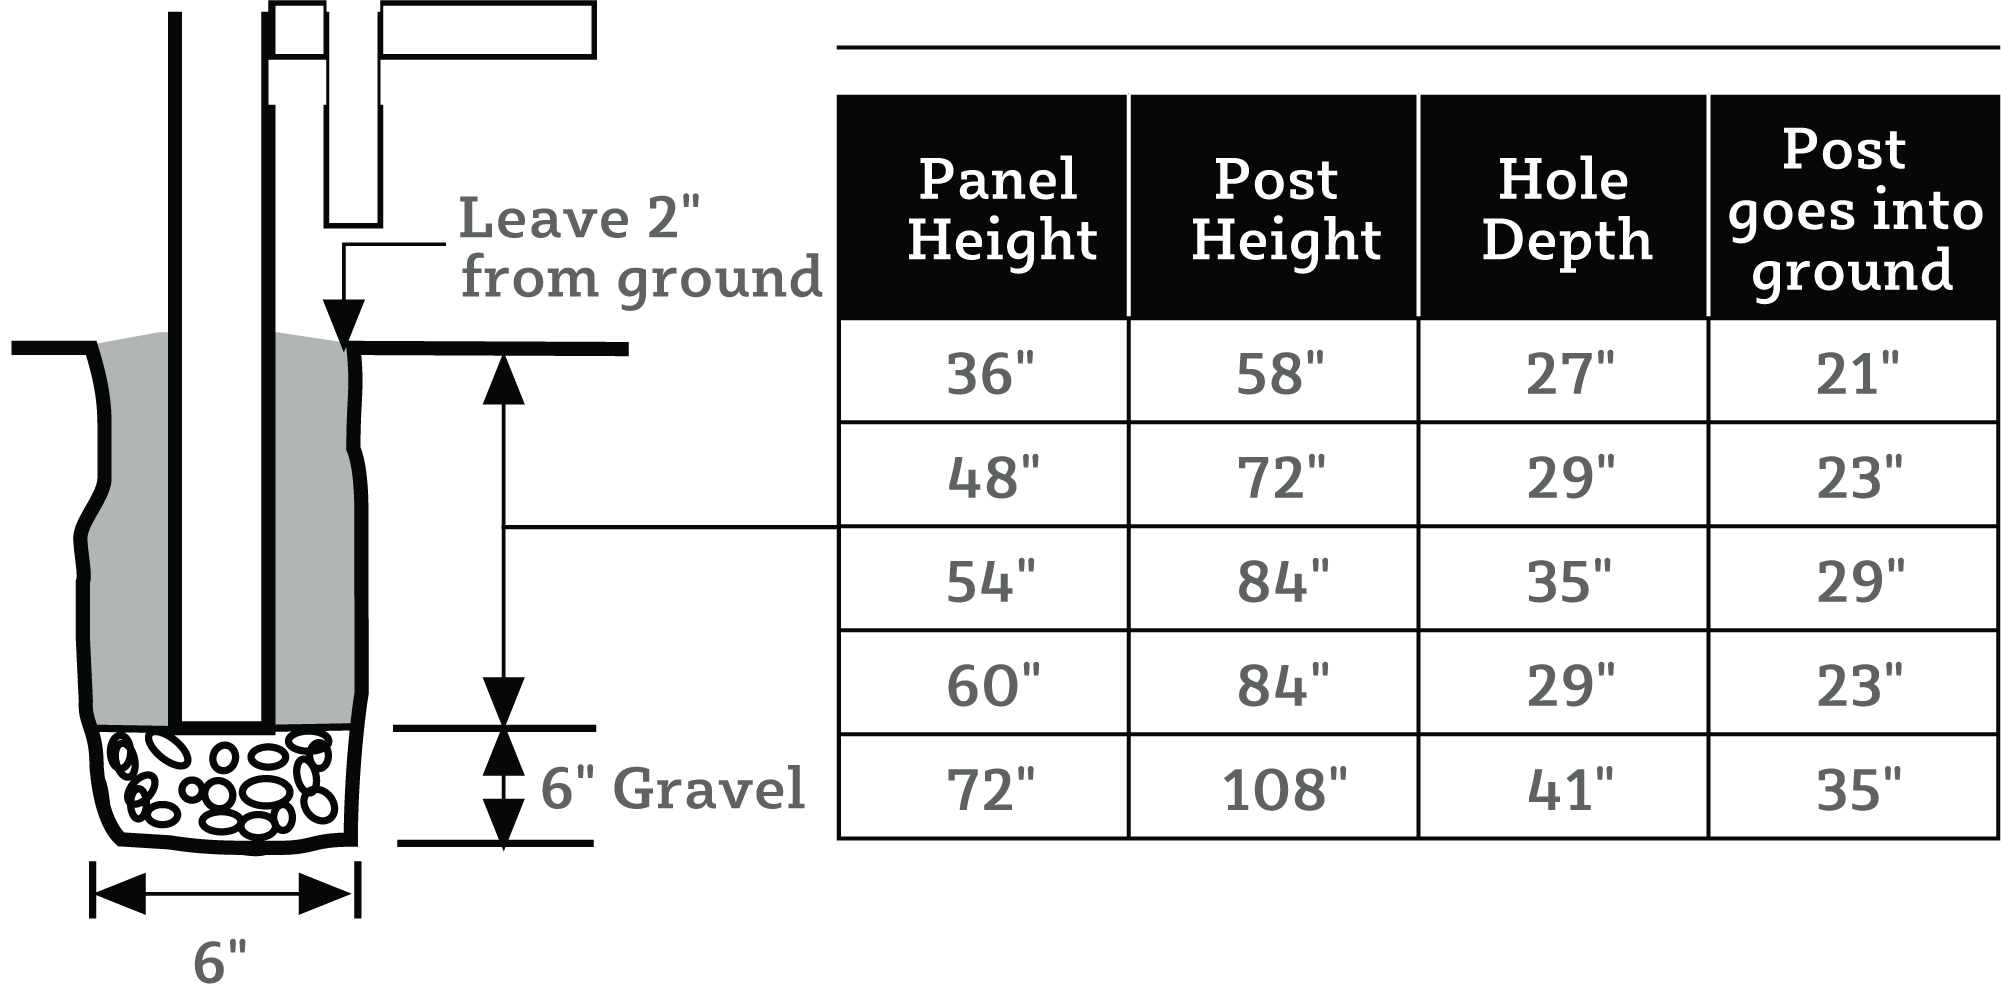
Step 3: Start the post-installation with a gate, corner, or end. Dig post holes to the appropriate depth, approximately 6 inches wide. Fill the bottom of the hole with approximately 6 inches of pea stone/gravel and place the post onto the gravel. Fill the holes with concrete and tamp down each post, and leave concrete about 2 inches from ground level.
Step 4: If you are installing a gate, the opening between the posts should be 1-1/4 inch wider than the width of the gate to allow for the hinges. Make sure that the posts are level and plumb. Brace the posts as necessary while the concrete is setting.
Panel and Post Installation
CAUTION: When installing your fence, we recommend installing 1 post and section at a time.

Step 1: Note: It is easier to dig the next post hole and place the gravel inside the hole before attaching the panel to the previous post As the gate post, or the corner post, is set up, install the first fence panel. Insert the horizontal rails into the pre-cut holes in the post (Post A). Place the rails as close to the posts as possible.
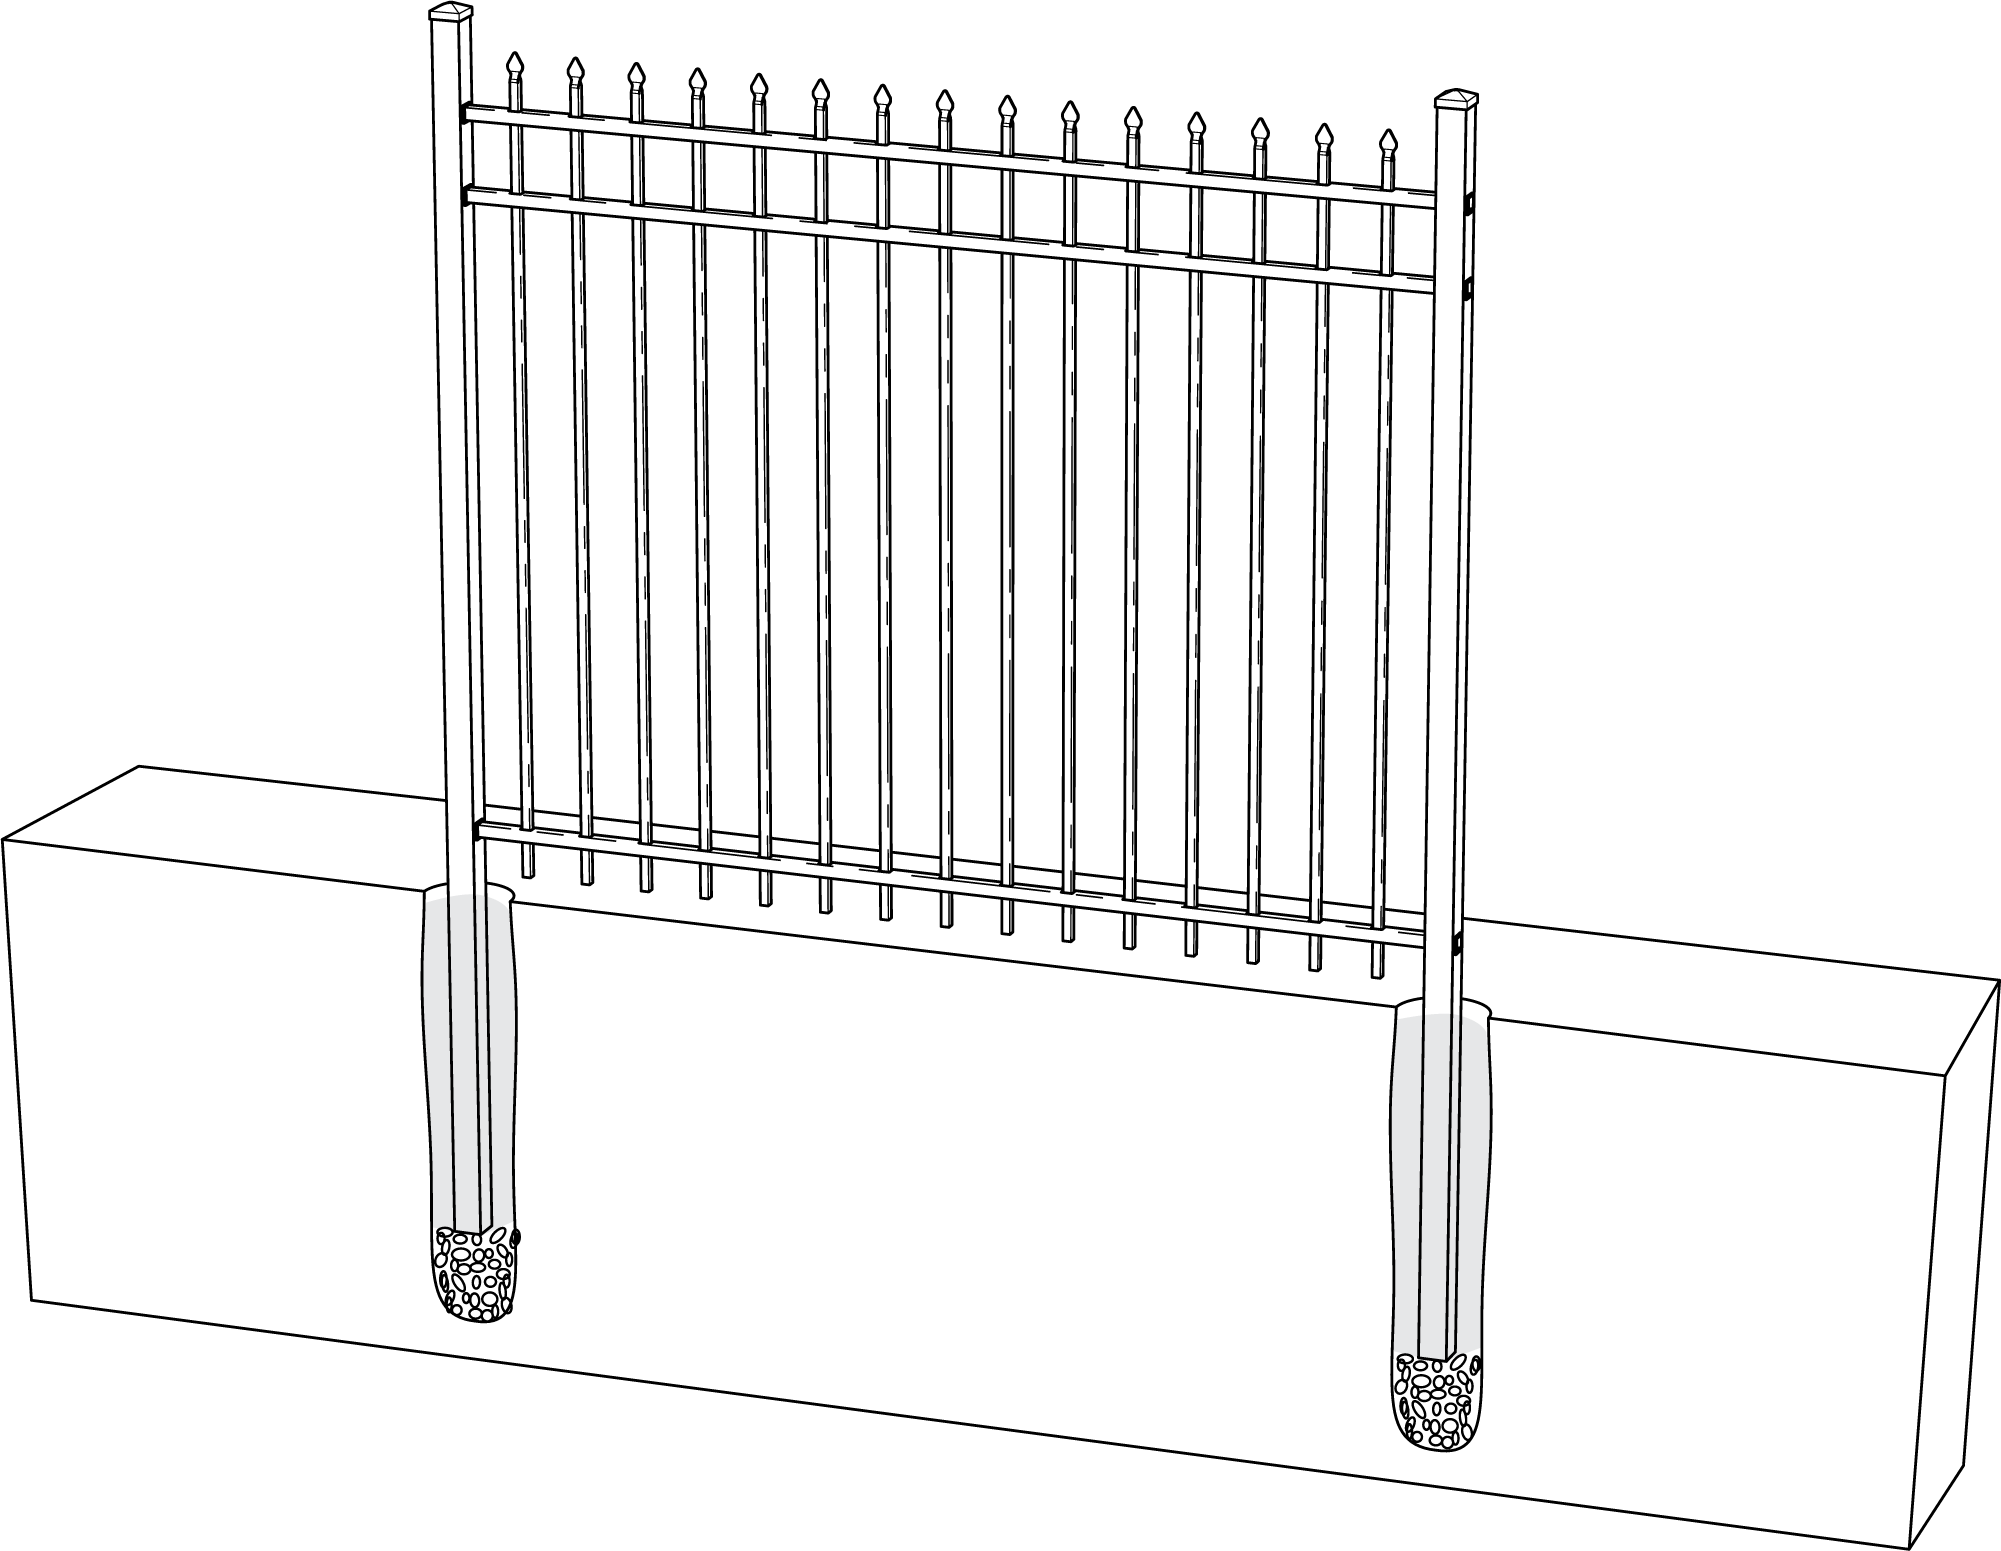
Step 2: Place the next post (or line, corner, end) in the adjacent hole and slide the post onto the rails of the panel as firmly as possible. Pour your concrete around that post and tamp it down, leaving the concrete about 2 inches from ground level.
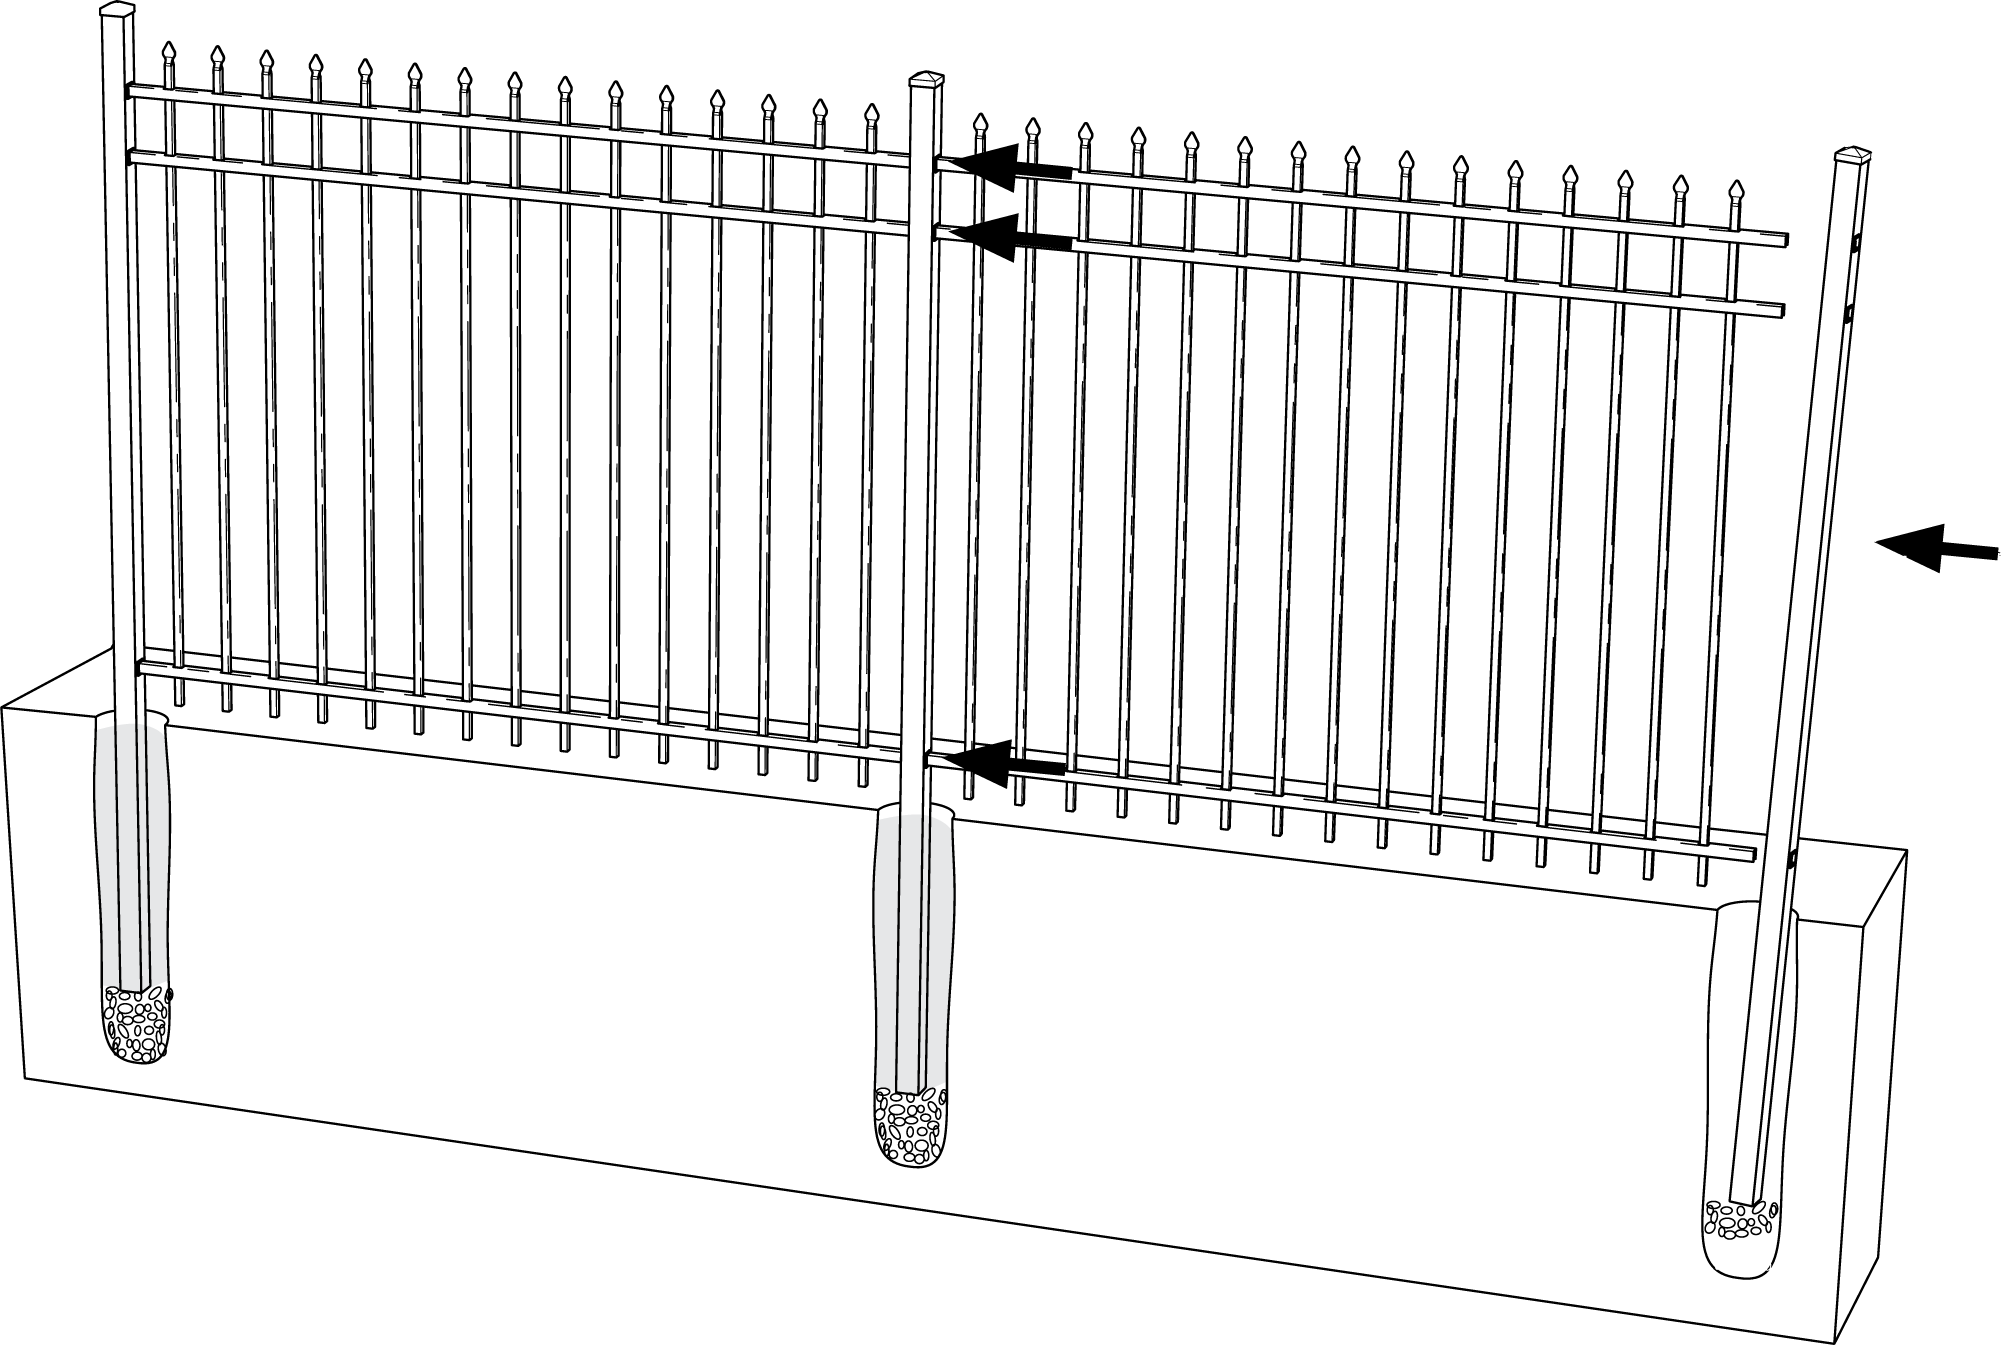
Step 3: Repeat by digging the next hole and filling it with 6 inches of travel. Then, insert the next panel into the previously installed post. Place the next post into the hole and slide the post onto the rails of the panel as firmly as possible. Pour Concrete around that post and tamp it down, leaving the concrete about 2 inches from ground level. Repeat until the end of the line.

Step 4: Corner posts require some additional work on one of the fence panels. The rail of one panel needs to be notched ½ an inch to allow the rails to nest adequately within a corner installation.
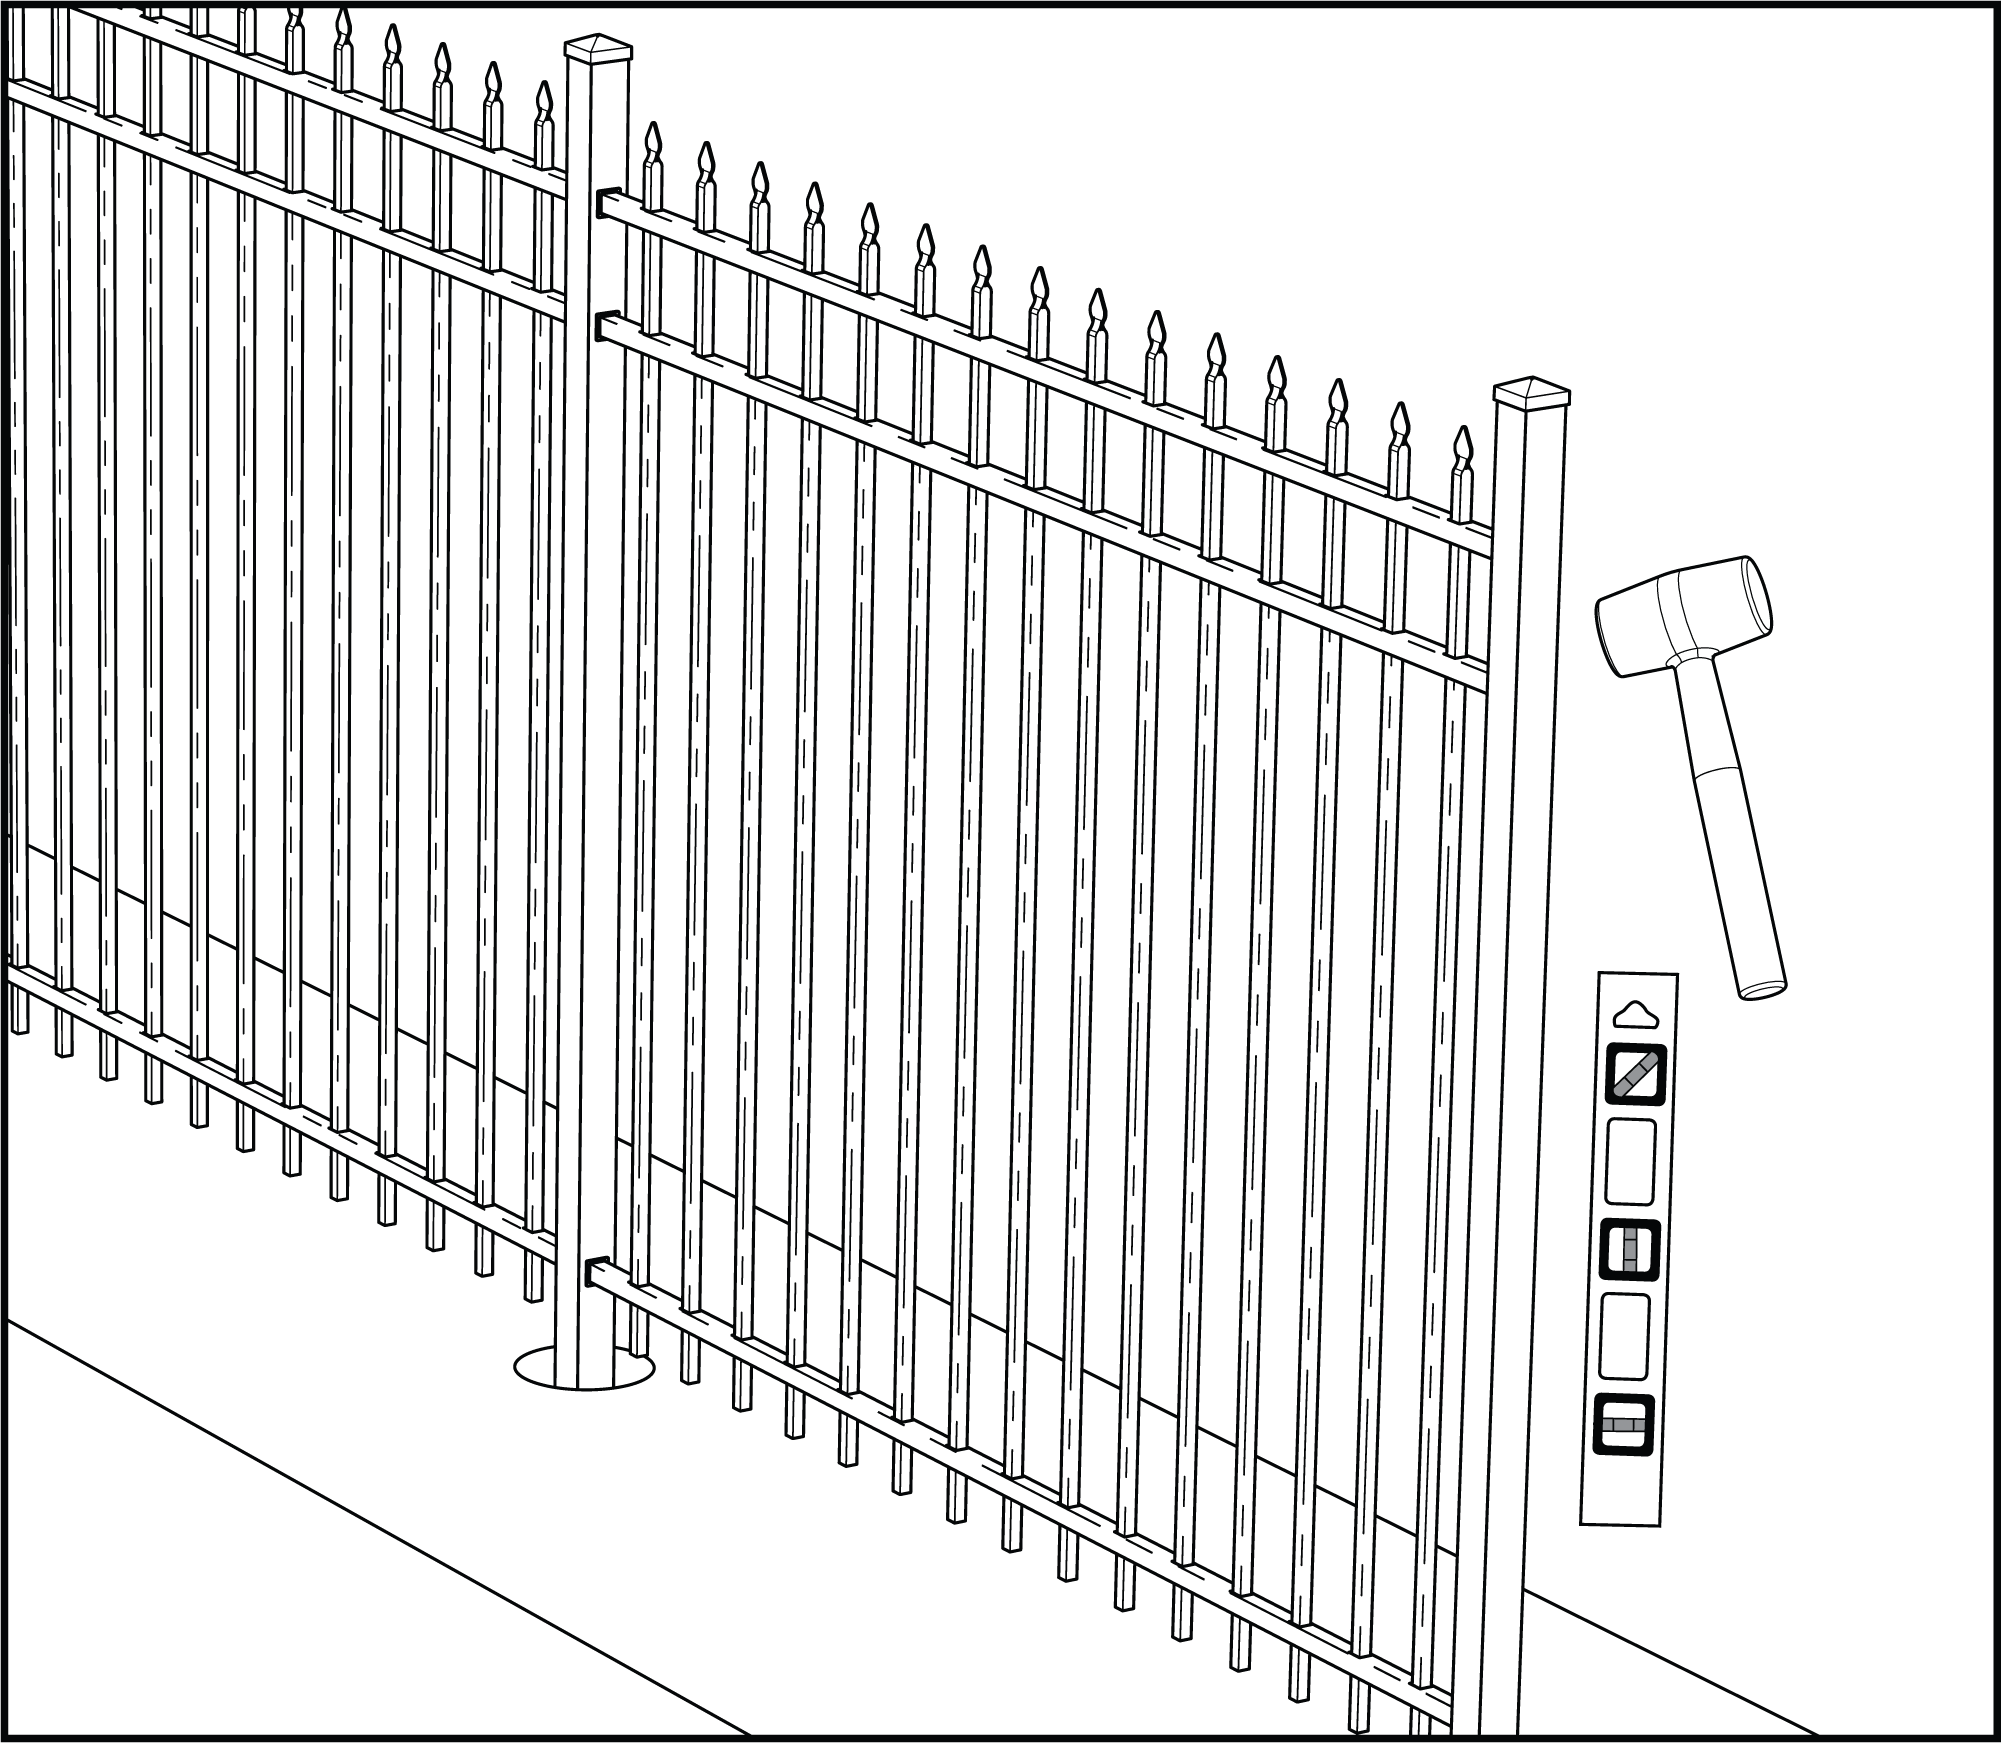
Step 5: Once 3 to 4 panels are installed, check to make sure that all the posts and panels are still horizontal. If corrections are needed, use the rubber mallet while the concrete is still soft. Be sure to continue to check the levelness of the fence over 3 to 4 panels for the duration of the project.
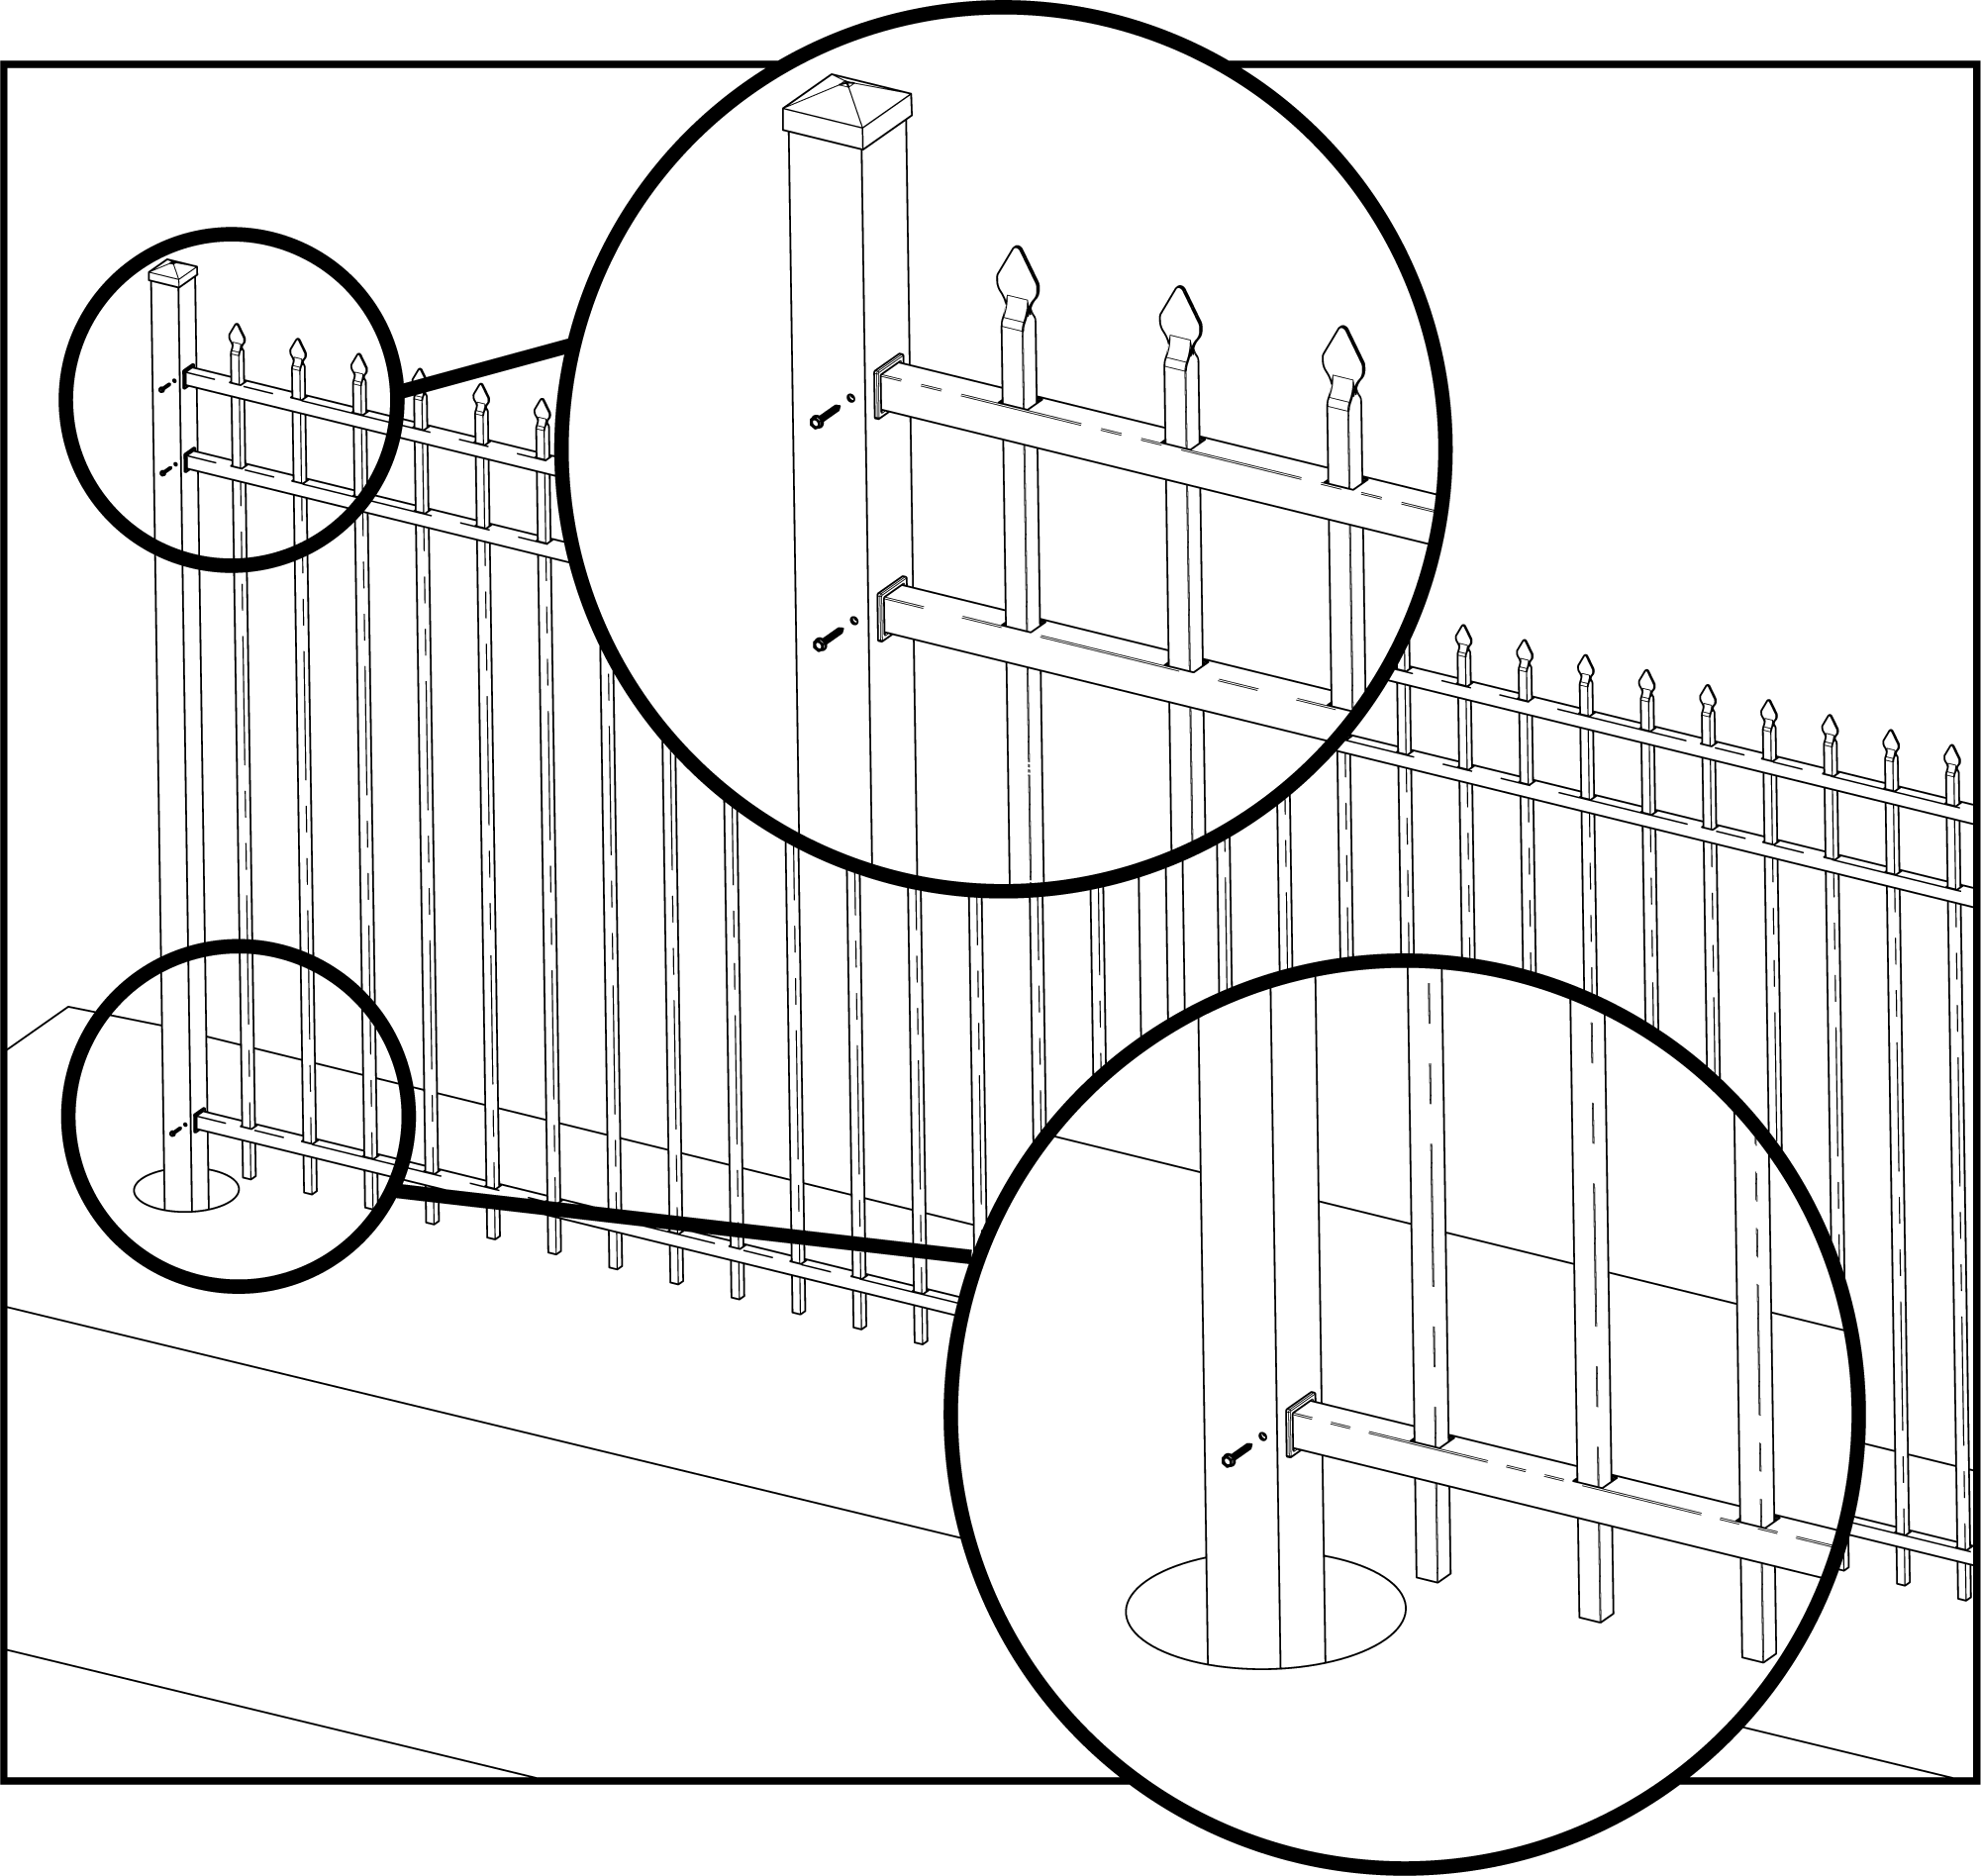
Step 6: After the concrete has set, fasten the fence section to the posts by using #8 x 1-inch self-tapping screws. Be careful not to over-tighten the screws, as the heads may be broken off or stripped out.
Hopefully, this step-by-step complete and comprehensive aluminum fence installation guide has helped you install your beautiful new fence. If you are having any issues or have questions about purchasing or installing your fence, feel free to give us a call at (888) 378-1096 or email us at sales@quickshipaluminumfence.com. Don’t forget to send us some pictures when the installation is complete!